 @DTCERT
T-Pot Version 19.03 released
In Mach 2019 we released T-Pot 19.03. Read more Details here.
T-Pot 19.03
T-Pot 19.03 runs on Debian (Sid), is based heavily on
and includes dockerized versions of the following honeypots
- adbhoney,
- ciscoasa,
- conpot,
- cowrie,
- dionaea,
- elasticpot,
- glastopf,
- glutton,
- heralding,
- honeypy,
- honeytrap,
- mailoney,
- medpot,
- rdpy,
- snare,
- tanner
Furthermore we use the following tools
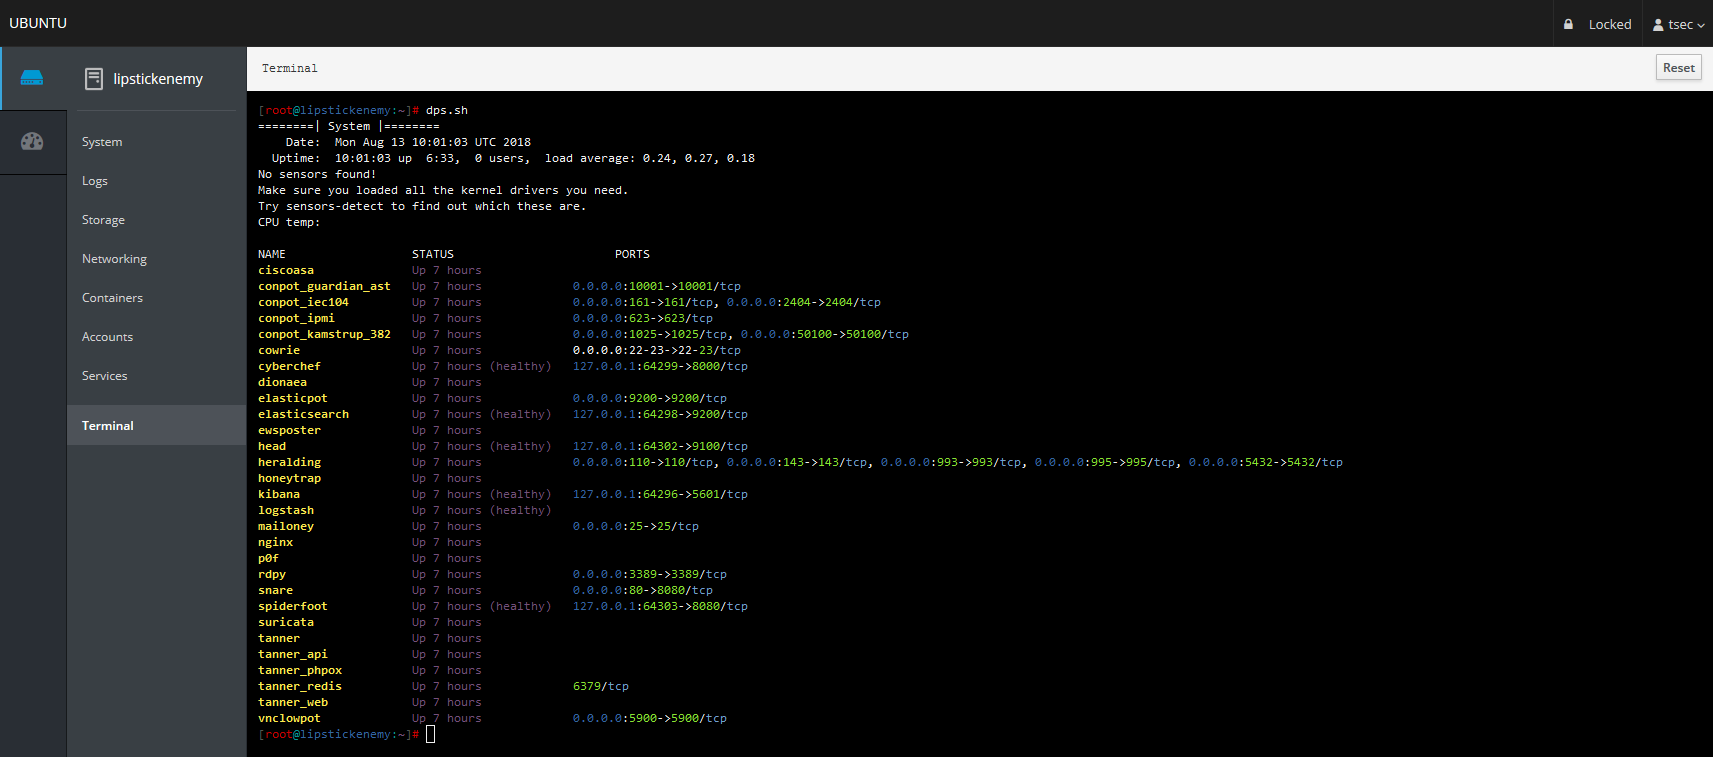
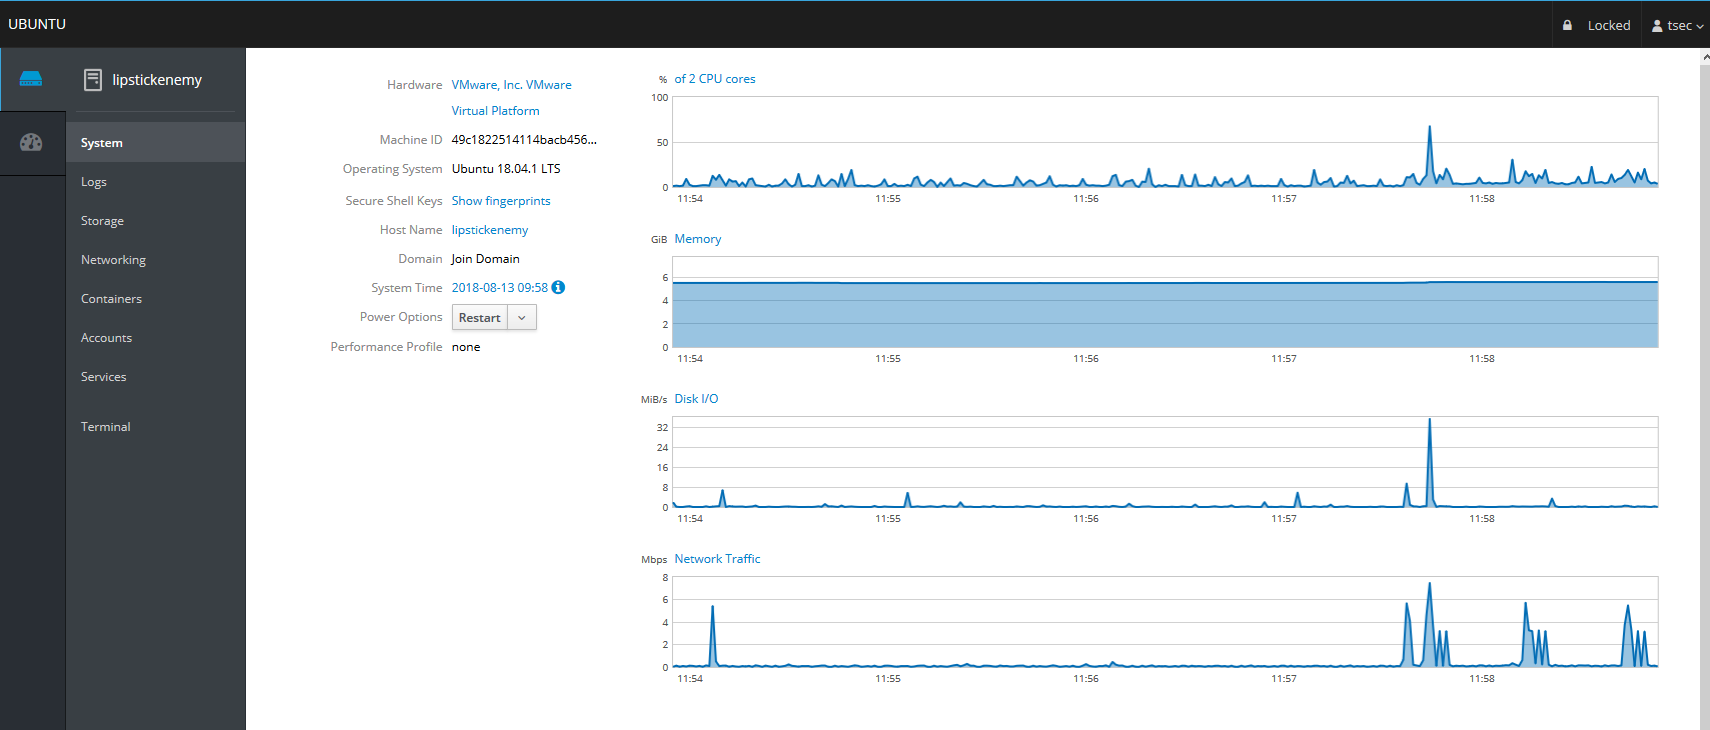
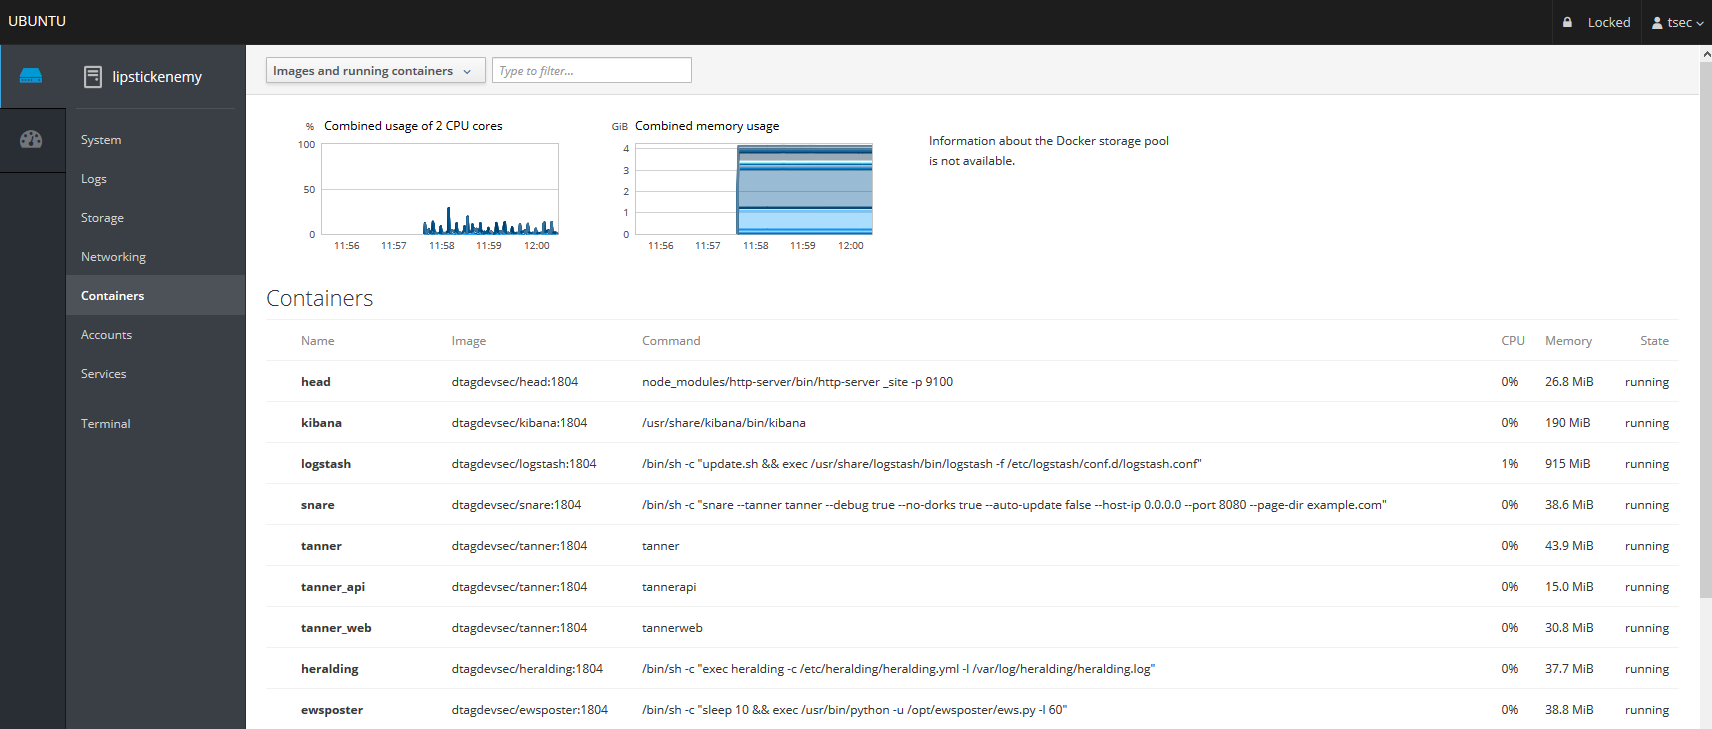
- Cockpit for a lightweight, webui for docker, os, real-time performance monitoring and web terminal.
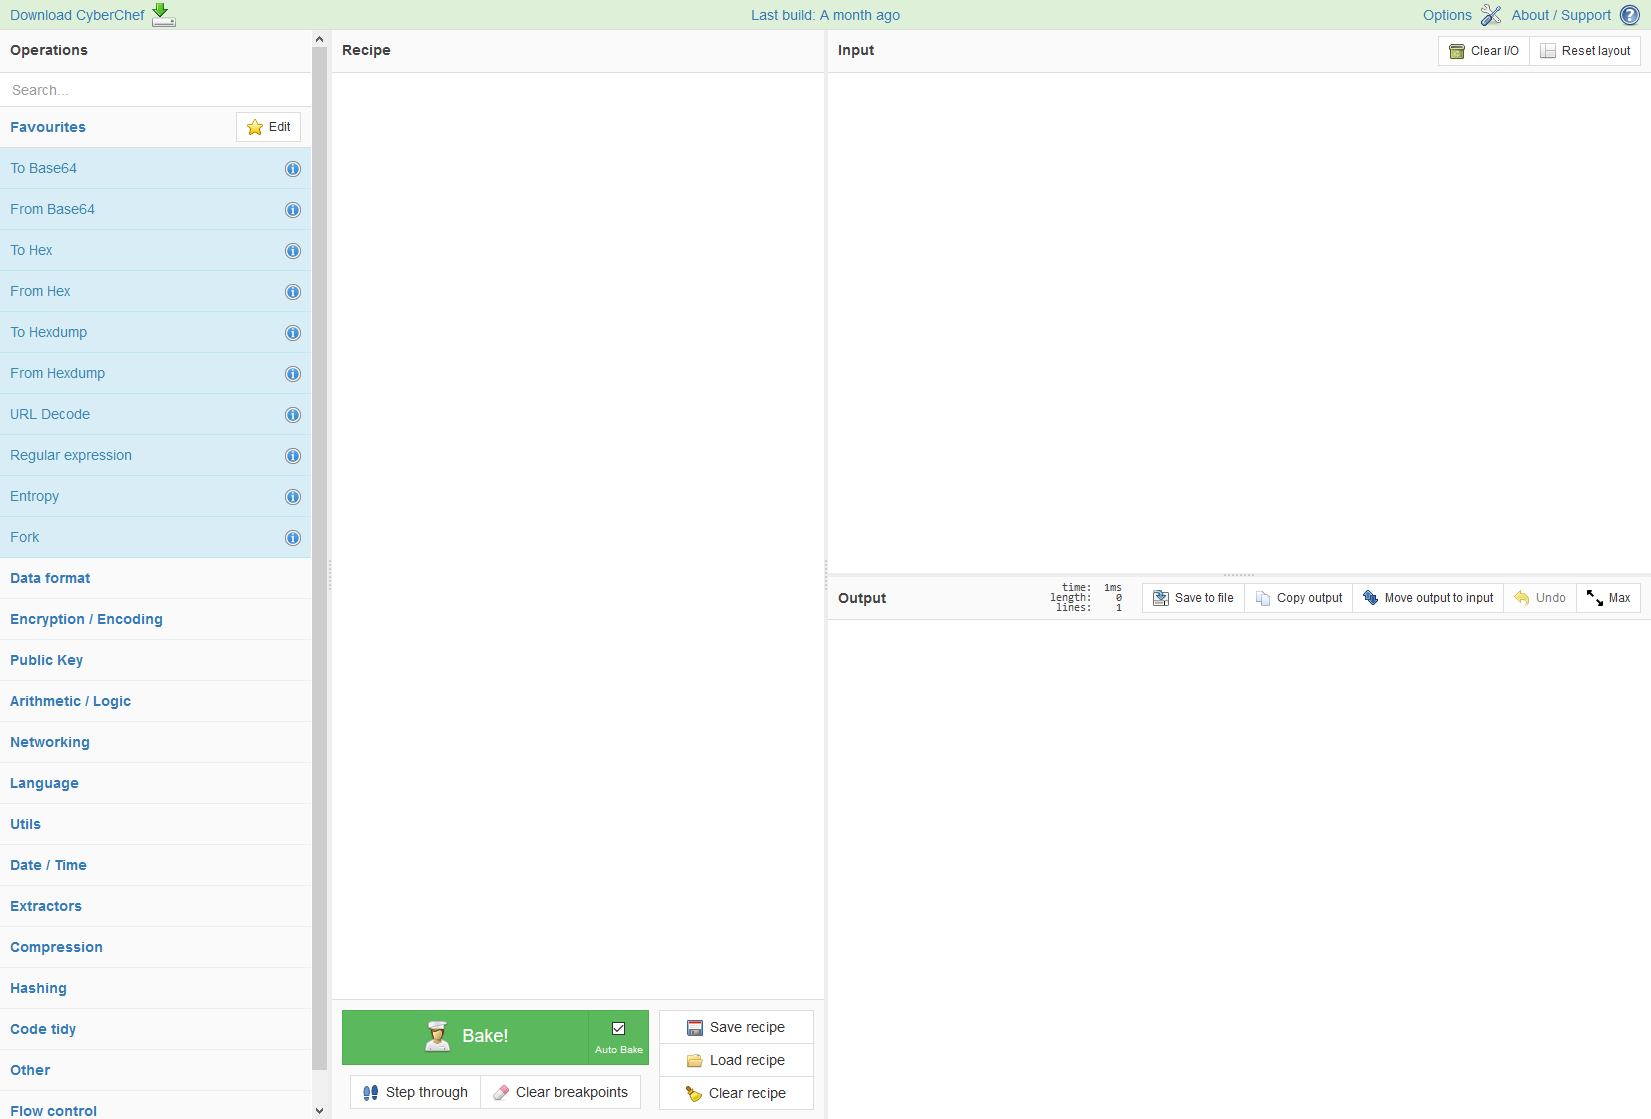
- Cyberchef a web app for encryption, encoding, compression and data analysis.
- ELK stack to beautifully visualize all the events captured by T-Pot.
- Elasticsearch Head a web front end for browsing and interacting with an Elastic Search cluster.
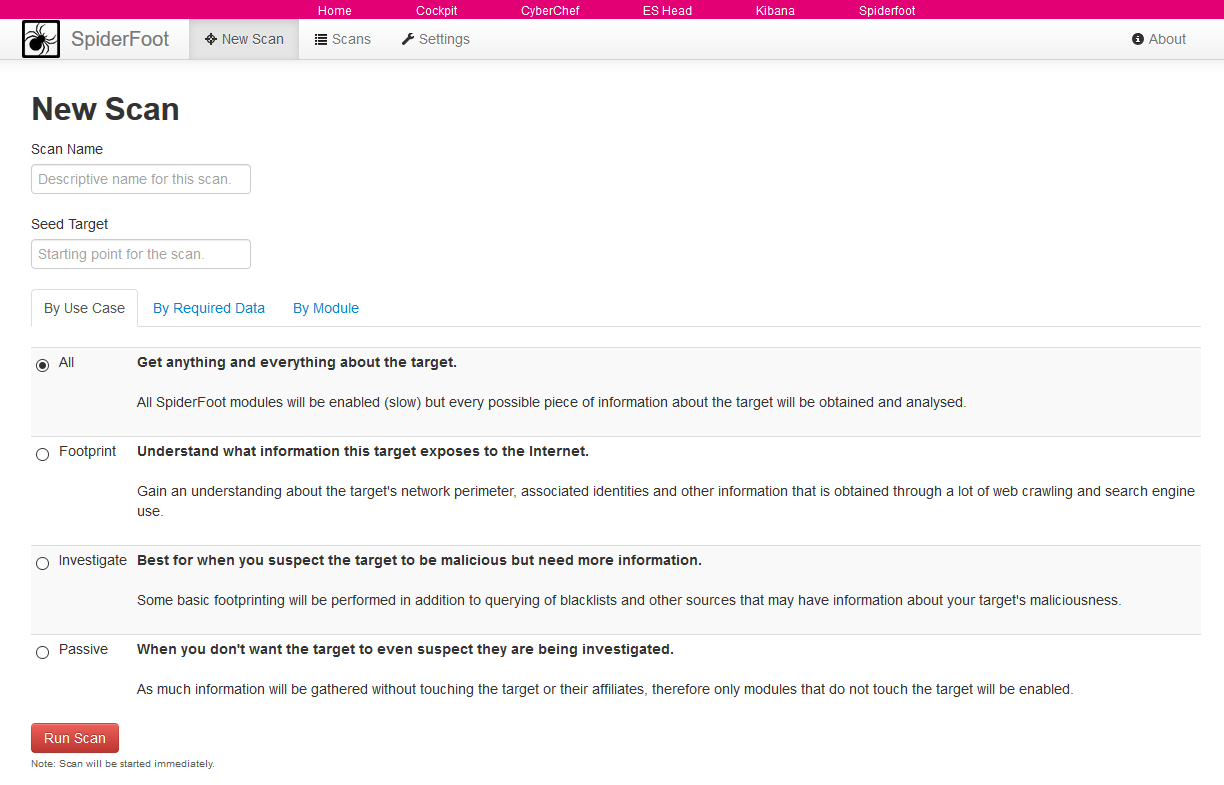
- Spiderfoot a open source intelligence automation tool.
- Suricata a Network Security Monitoring engine.
TL;DR
- Meet the system requirements. The T-Pot installation needs at least 6-8 GB RAM and 128 GB free disk space as well as a working internet connection.
- Download the T-Pot ISO from GitHub or create it yourself.
- Install the system in a VM or on physical hardware with internet access.
- Enjoy your favorite beverage - watch and analyze.
Table of Contents
- Changelog
- Technical Concept
- System Requirements
- Installation
- Updates
- Options
- Roadmap
- Disclaimer
- FAQ
- Contact
- Licenses
- Credits
- Stay tuned
- Testimonial
- Fun Fact
Release Notes
- Move from Ubuntu 18.04 to Debian (Sid)
- For almost 5 years Ubuntu LTS versions were our distributions of choice. Last year we made a design choice for T-Pot to be closer to a rolling release model and thus allowing us to issue smaller changes and releases in a more timely manner. The distribution of choice is Debian (Sid / unstable) which will provide us with the latest advancements in a Debian based distribution.
- Include HoneyPy honeypot
- HoneyPy is now included in the NEXTGEN installation type
- Include Suricata 4.1.3
- Building Suricata 4.1.3 from scratch to enable JA3 and overall better protocol support.
- Update tools to the latest versions
- ELK Stack 6.6.2
- CyberChef 8.27.0
- SpiderFoot v3.0
- Cockpit 188
- NGINX is now built to enforce TLS 1.3 on the T-Pot WebUI
- Update honeypots
- Where possible / feasible the honeypots have been updated to their latest versions.
- Cowrie now supports HASSH generated hashes which allows for an easier identification of an attacker accross IP adresses.
- Heralding now supports SOCKS5 emulation.
- Update Dashboards & Visualizations
- Offset Dashboard added to easily spot changes in attacks on a single dashboard in 24h time window.
- Cowrie Dashboard modified to integrate HASSH support / visualizations.
- HoneyPy Dashboard added to support latest honeypot addition.
- Suricata Dashboard modified to integrate JA3 support / visualizations.
- Debian mirror selection
- During base install you now have to manually select a mirror.
- Upon T-Pot install the mirror closest to you will be determined automatically,
netselect-aptrequires you to allow ICMP outbound. - This solves peering problems for most of the users speeding up installation and updates.
- Bugs
- Fixed issue #298 where the import and export of objects on the shell did not work.
- Fixed issue #313 where Spiderfoot raised a KeyError, which was previously fixed in upstream.
- Fixed error in Suricata where path for reference.config changed.
- Release Cycle
- As far as possible we will integrate changes now faster into the master branch, eliminating the need for monolithic releases. The update feature will be continuously improved on that behalf. However this might not account for all feature changes.
- HPFEEDS Opt-In
- If you want to share your T-Pot data with a 3rd party HPFEEDS broker such as SISSDEN you can do so by creating an account at the SISSDEN portal and run
hpfeeds_optin.shon T-Pot.
- If you want to share your T-Pot data with a 3rd party HPFEEDS broker such as SISSDEN you can do so by creating an account at the SISSDEN portal and run
- Update Feature
- For the ones who like to live on the bleeding edge of T-Pot development there is now an update script available in
/opt/tpot/update.sh. - This feature is beta and is mostly intended to provide you with the latest development advances without the need of reinstalling T-Pot.
- For the ones who like to live on the bleeding edge of T-Pot development there is now an update script available in
- Deprecated tools
- ctop will no longer be part of T-Pot.
- Fix #332
- If T-Pot, opposed to the requirements, does not have full internet access netselect-apt fails to determine the fastest mirror as it needs ICMP and UDP outgoing. Should netselect-apt fail the default mirrors will be used.
- Improve install speed with apt-fast
- Migrating from a stable base install to Debian (Sid) requires downloading lots of packages. Depending on your geo location the download speed was already improved by introducing netselect-apt to determine the fastest mirror. Wit h apt-fast the downloads will be even faster by downloading packages not only in parallel but also with multiple connections per package.
Technical Concept
T-Pot is based on the network installer Debian (Stretch). During installation the whole system will be updated to Debian (Sid). The honeypot daemons as well as other support components being used have been containerized using docker. This allows us to run multiple honeypot daemons on the same network interface while maintaining a small footprint and constrain each honeypot within its own environment.
In T-Pot we combine the dockerized honeypots …
- adbhoney,
- ciscoasa,
- conpot,
- cowrie,
- dionaea,
- elasticpot,
- glastopf,
- glutton,
- heralding,
- honeypy,
- honeytrap,
- mailoney,
- medpot,
- rdpy,
- snare,
- tanner
… with the following tools …
- Cockpit for a lightweight, webui for docker, os, real-time performance monitoring and web terminal.
- Cyberchef a web app for encryption, encoding, compression and data analysis.
- ELK stack to beautifully visualize all the events captured by T-Pot.
- Elasticsearch Head a web front end for browsing and interacting with an Elastic Search cluster.
- Spiderfoot a open source intelligence automation tool.
- Suricata a Network Security Monitoring engine.
… to give you the best out-of-the-box experience possible and an easy-to-use multi-honeypot appliance.
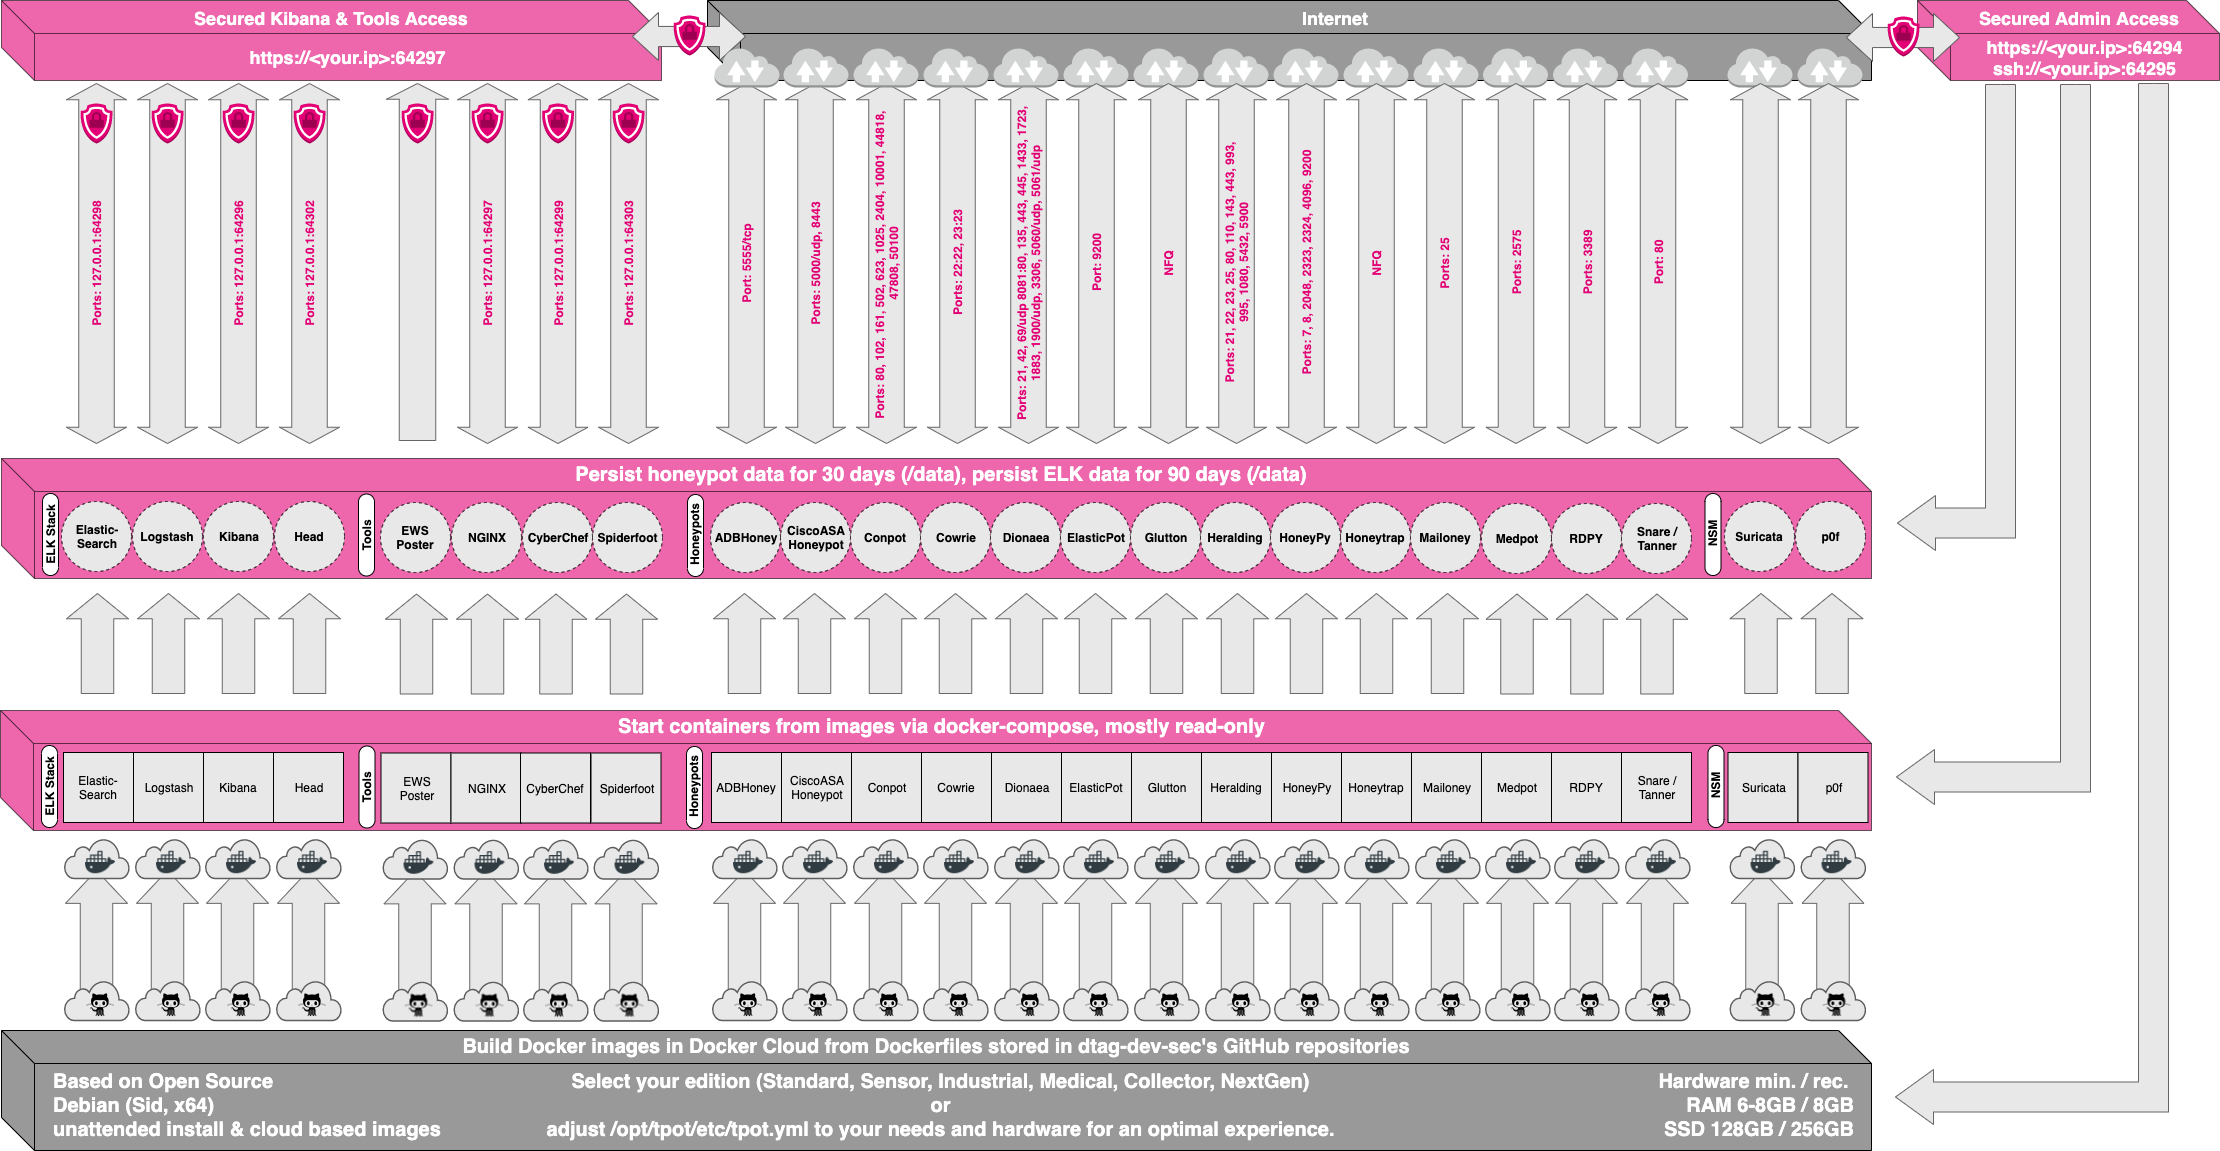
While data within docker containers is volatile we do ensure a default 30 day persistence of all relevant honeypot and tool data in the well known /data folder and sub-folders. The persistence configuration may be adjusted in /opt/tpot/etc/logrotate/logrotate.conf. Once a docker container crashes, all other data produced within its environment is erased and a fresh instance is started from the corresponding docker image.
Basically, what happens when the system is booted up is the following:
- start host system
- start all the necessary services (i.e. cockpit, docker, etc.)
- start all docker containers via docker-compose (honeypots, nms, elk, etc.)
Within the T-Pot project, we provide all the tools and documentation necessary to build your own honeypot system and contribute to our Sicherheitstacho.
The source code and configuration files are fully stored in the T-Pot GitHub repository. The docker images are pre-configured for the T-Pot environment. If you want to run the docker images separately, make sure you study the docker-compose configuration (/opt/tpot/etc/tpot.yml) and the T-Pot systemd script (/etc/systemd/system/tpot.service), as they provide a good starting point for implementing changes.
The individual docker configurations are located in the docker folder.
System Requirements
Depending on your installation type, whether you install on real hardware or in a virtual machine, make sure your designated T-Pot system meets the following requirements:
Standard Installation
- Honeypots: adbhoney, ciscoasa, conpot, cowrie, dionaea, elasticpot, heralding, honeytrap, mailoney, medpot, rdpy, snare & tanner
-
Tools: cockpit, cyberchef, ELK, elasticsearch head, ewsposter, NGINX, spiderfoot, p0f and suricata
- 6-8 GB RAM (less RAM is possible but might introduce swapping)
- 128 GB SSD (smaller is possible but limits the capacity of storing events)
- Network via DHCP
- A working, non-proxied, internet connection
Sensor Installation
- Honeypots: adbhoney, ciscoasa, conpot, cowrie, dionaea, elasticpot, heralding, honeytrap, mailoney, medpot, rdpy, snare & tanner
-
Tools: cockpit
- 6-8 GB RAM (less RAM is possible but might introduce swapping)
- 128 GB SSD (smaller is possible but limits the capacity of storing events)
- Network via DHCP
- A working, non-proxied, internet connection
Industrial Installation
- Honeypots: conpot, cowrie, heralding, medpot, rdpy
-
Tools: cockpit, cyberchef, ELK, elasticsearch head, ewsposter, NGINX, spiderfoot, p0f and suricata
- 6-8 GB RAM (less RAM is possible but might introduce swapping)
- 128 GB SSD (smaller is possible but limits the capacity of storing events)
- Network via DHCP
- A working, non-proxied, internet connection
Collector Installation (because sometimes all you want to do is catching credentials)
- Honeypots: heralding
-
Tools: cockpit, cyberchef, ELK, elasticsearch head, ewsposter, NGINX, spiderfoot, p0f and suricata
- 6-8 GB RAM (less RAM is possible but might introduce swapping)
- 128 GB SSD (smaller is possible but limits the capacity of storing events)
- Network via DHCP
- A working, non-proxied, internet connection
NextGen Installation (Glutton replacing Honeytrap, HoneyPy replacing Elasticpot)
- Honeypots: adbhoney, ciscoasa, conpot, cowrie, dionaea, glutton, heralding, honeypy, mailoney, rdpy, snare & tanner
-
Tools: cockpit, cyberchef, ELK, elasticsearch head, ewsposter, NGINX, spiderfoot, p0f and suricata
- 6-8 GB RAM (less RAM is possible but might introduce swapping)
- 128 GB SSD (smaller is possible but limits the capacity of storing events)
- Network via DHCP
- A working, non-proxied, internet connection
Installation
The installation of T-Pot is straight forward and heavily depends on a working, transparent and non-proxied up and running internet connection. Otherwise the installation will fail!
Firstly, decide if you want to download our prebuilt installation ISO image from GitHub, create it yourself or post-install on an existing Debian 9.7 (Stretch).
Secondly, decide where you want to let the system run: real hardware or in a virtual machine?
Prebuilt ISO Image
We provide an installation ISO image for download (~50MB), which is created using the same tool you can use yourself in order to create your own image. It will basically just save you some time downloading components and creating the ISO image. You can download the prebuilt installation image from GitHub and jump to the installation section.
Create your own ISO Image
For transparency reasons and to give you the ability to customize your install, we provide you the ISO Creator that enables you to create your own ISO installation image.
Requirements to create the ISO image:
- Debian 9.7 or newer as host system (others may work, but remain untested)
- 4GB of free memory
- 32GB of free storage
- A working internet connection
How to create the ISO image:
- Clone the repository and enter it.
git clone https://github.com/dtag-dev-sec/tpotce cd tpotce - Invoke the script that builds the ISO image.
The script will download and install dependencies necessary to build the image on the invoking machine. It will further download the ubuntu network installer image (~50MB) which T-Pot is based on.
sudo ./makeiso.shAfter a successful build, you will find the ISO image
tpot.isoalong with a SHA256 checksumtpot.sha256in your directory.
Running in VM
You may want to run T-Pot in a virtualized environment. The virtual system configuration depends on your virtualization provider.
We successfully tested T-Pot with VirtualBox and VMWare with just little modifications to the default machine configurations.
It is important to make sure you meet the system requirements and assign a virtual harddisk and RAM according to the requirements while making sure networking is bridged.
You need to enable promiscuous mode for the network interface for suricata and p0f to work properly. Make sure you enable it during configuration.
If you want to use a wifi card as a primary NIC for T-Pot, please be aware of the fact that not all network interface drivers support all wireless cards. E.g. in VirtualBox, you then have to choose the “MT SERVER” model of the NIC.
Lastly, mount the tpot.iso ISO to the VM and continue with the installation.
You can now jump here.
Running on Hardware
If you decide to run T-Pot on dedicated hardware, just follow these steps:
- Burn a CD from the ISO image or make a bootable USB stick using the image.
Whereas most CD burning tools allow you to burn from ISO images, the procedure to create a bootable USB stick from an ISO image depends on your system. There are various Windows GUI tools available, e.g. this tip might help you.
On Linux or MacOS you can use the tool dd or create the USB stick with T-Pot’s ISO Creator. - Boot from the USB stick and install.
Please note: While we are performing limited tests with the Intel NUC platform other hardware platforms remain untested. We can not provide hardware support of any kind.
Post-Install User
In some cases it is necessary to install Debian 9.7 (Stretch) on your own:
- Cloud provider does not offer mounting ISO images.
- Hardware setup needs special drivers and / or kernels.
- Within your company you have to setup special policies, software etc.
- You just like to stay on top of things.
The T-Pot Universal Installer will upgrade the system to Debian (Sid) and install all required T-Pot dependencies.
Just follow these steps:
git clone https://github.com/dtag-dev-sec/tpotce
cd tpotce/iso/installer/
./install.sh --type=user
The installer will now start and guide you through the install process.
Post-Install Auto
You can also let the installer run automatically if you provide your own tpot.conf. An example is available in tpotce/iso/installer/tpot.conf.dist. This should make things easier in case you want to automate the installation i.e. with Ansible.
Just follow these steps while adjusting tpot.conf to your needs:
git clone https://github.com/dtag-dev-sec/tpotce
cd tpotce/iso/installer/
cp tpot.conf.dist tpot.conf
./install.sh --type=auto --conf=tpot.conf
The installer will start automatically and guide you through the install process.
First Run
The installation requires very little interaction, only a locale and keyboard setting have to be answered for the basic linux installation. The system will reboot and please maintain the active internet connection. The T-Pot installer will start and ask you for an installation type, password for the tsec user and credentials for a web user. Everything else will be configured automatically. All docker images and other componenents will be downloaded. Depending on your network connection and the chosen installation type, the installation may take some time. During our tests (250Mbit down, 40Mbit up), the installation was usually finished within a 15-30 minute timeframe.
Once the installation is finished, the system will automatically reboot and you will be presented with the T-Pot login screen. On the console you may login with:
- user: [tsec or user] you chose during one of the post install methods
- pass: [password] you chose during the installation
All honeypot services are preconfigured and are starting automatically.
You can login from your browser and access the Admin UI: https://<your.ip>:64294 or via SSH to access the command line: ssh -l tsec -p 64295 <your.ip>
- user: [tsec or user] you chose during one of the post install methods
- pass: [password] you chose during the installation
You can also login from your browser and access the Web UI: https://<your.ip>:64297
- user: [user] you chose during the installation
- pass: [password] you chose during the installation
System Placement
Make sure your system is reachable through a network you suspect intruders in / from (i.e. the internet). Otherwise T-Pot will most likely not capture any attacks, other than the ones from your internal network! We recommend you put it in an unfiltered zone, where all TCP and UDP traffic is forwarded to T-Pot’s network interface. However to avoid fingerprinting you can put T-Pot behind a firewall and forward all TCP / UDP traffic in the port range of 1-64000 to T-Pot while allowing access to ports > 64000 only from trusted IPs.
A list of all relevant ports is available as part of the Technical Concept
Basically, you can forward as many TCP ports as you want, as honeytrap dynamically binds any TCP port that is not covered by the other honeypot daemons.
In case you need external Admin UI access, forward TCP port 64294 to T-Pot, see below. In case you need external SSH access, forward TCP port 64295 to T-Pot, see below. In case you need external Web UI access, forward TCP port 64297 to T-Pot, see below.
T-Pot requires outgoing git, http, https connections for updates (Debian, Docker, GitHub, PyPi) and attack submission (ewsposter, hpfeeds). Ports and availability may vary based on your geographical location.
Updates
For the ones of you who want to live on the bleeding edge of T-Pot development we introduced an update feature which will allow you to update all T-Pot relevant files to be up to date with the T-Pot master branch. If you made any relevant changes to the T-Pot relevant config files make sure to create a backup first.
- The Update script will
- merciless overwrite local changes to be in sync with the T-Pot master branch
- upgrade the system to the packages available in Debian (Sid)
- update all resources to be in-sync with the T-Pot master branch
- ensure all T-Pot relevant system files will be patched / copied into the original T-Pot state
You simply run the update script:
cd /opt/tpot/
./update.sh -y
Despite all our efforts please be reminded that updates sometimes may have unforeseen consequences. Please create a backup of the machine or the files with the most value to your work.
Options
The system is designed to run without any interaction or maintenance and automatically contributes to the community.
We know, for some this may not be enough. So here come some ways to further inspect the system and change configuration parameters.
SSH and web access
By default, the SSH daemon allows access on tcp/64295 with a user / password combination and prevents credential brute forcing attempts using fail2ban. This also counts for Admin UI (tcp/64294) and Web UI (tcp/64297) access.
If you do not have a SSH client at hand and still want to access the machine via command line you can do so by accessing the Admin UI from https://<your.ip>:64294, enter
- user: [tsec or user] you chose during one of the post install methods
- pass: [password] you chose during the installation
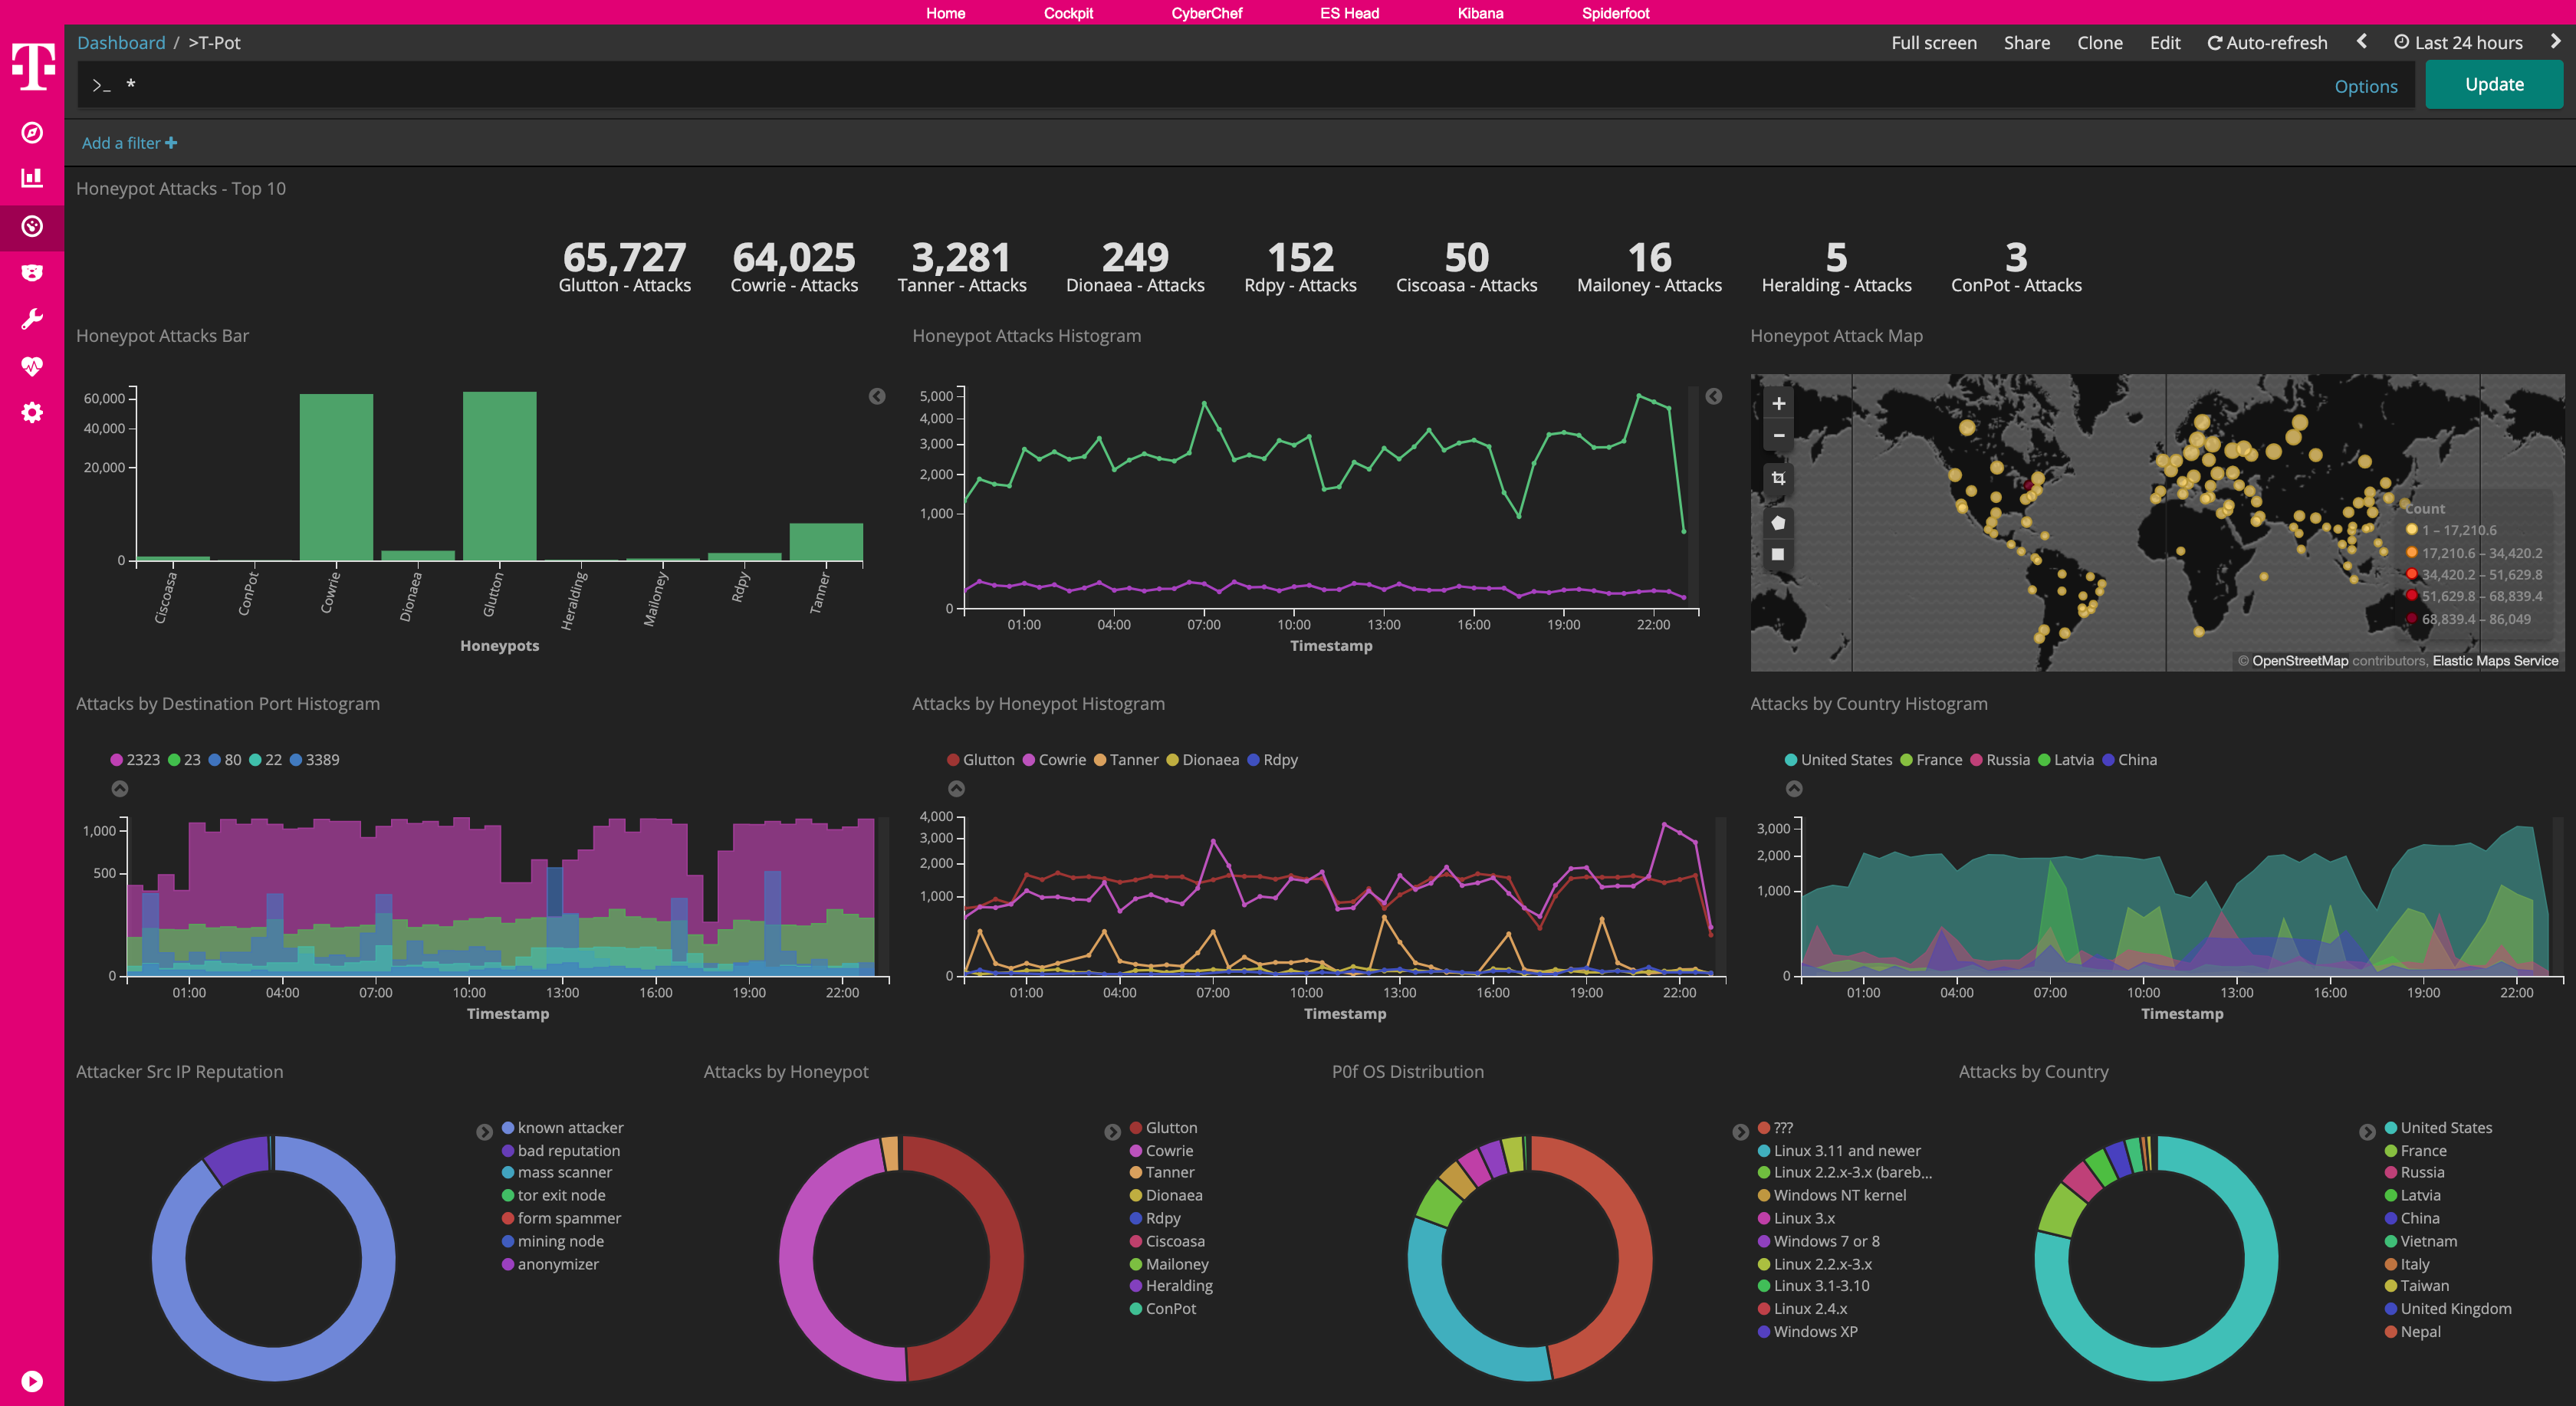
Kibana Dashboard
Just open a web browser and connect to https://<your.ip>:64297, enter
- user: [user] you chose during the installation
- pass: [password] you chose during the installation
and Kibana will automagically load. The Kibana dashboard can be customized to fit your needs. By default, we haven’t added any filtering, because the filters depend on your setup. E.g. you might want to filter out your incoming administrative ssh connections and connections to update servers.
Tools
We included some web based management tools to improve and ease up on your daily tasks.
Maintenance
As mentioned before, the system is designed to be low maintenance. Basically, there is nothing you have to do but let it run.
If you run into any problems, a reboot may fix it :bowtie:
If new versions of the components involved appear, we will test them and build new docker images. Those new docker images will be pushed to docker hub and downloaded to T-Pot and activated accordingly.
Community Data Submission
We provide T-Pot in order to make it accessible to all parties interested in honeypot deployment. By default, the captured data is submitted to a community backend. This community backend uses the data to feed Sicherheitstacho.
You may opt out of the submission by removing the # Ewsposter service from /opt/tpot/etc/tpot.yml:
- Stop T-Pot services:
systemctl stop tpot - Remove Ewsposter service:
vi /opt/tpot/etc/tpot.yml - Remove the following lines, save and exit vi (
:x!):
```Ewsposter service
ewsposter: container_name: ewsposter restart: always networks:
- ewsposter_local image: “dtagdevsec/ewsposter:1903” volumes:
- /data:/data
- /data/ews/conf/ews.ip:/opt/ewsposter/ews.ip ```
- Start T-Pot services:
systemctl start tpot
Data is submitted in a structured ews-format, a XML stucture. Hence, you can parse out the information that is relevant to you.
We encourage you not to disable the data submission as it is the main purpose of the community approach - as you all know sharing is caring 😍
Opt-In HPFEEDS Data Submission
As an Opt-In it is now possible to also share T-Pot data with 3rd party HPFEEDS brokers, such as SISSDEN.
If you want to share your T-Pot data you simply have to register an account with a 3rd party broker with its own benefits towards the community. Once registered you will receive your credentials to share events with the broker. In T-Pot you simply run hpfeeds_optin.sh which will ask for your credentials, in case of SISSDEN this is just Ident and Secret, everything else is pre-configured. It will automatically update /opt/tpot/etc/tpot.yml to deliver events to your desired broker.
Roadmap
As with every development there is always room for improvements …
Some features may be provided with updated docker images, others may require some hands on from your side.
You are always invited to participate in development on our GitHub page.
Disclaimer
- We don’t have access to your system. So we cannot remote-assist when you break your configuration. But you can simply reinstall.
- The software was designed with best effort security, not to be in stealth mode. Because then, we probably would not be able to provide those kind of honeypot services.
- You install and you run within your responsibility. Choose your deployment wisely as a system compromise can never be ruled out.
- Honeypots should - by design - may not host any sensitive data. Make sure you don’t add any.
- By default, your data is submitted to the community dashboard. You can disable this in the config. But hey, wouldn’t it be better to contribute to the community?
FAQ
Please report any issues or questions on our GitHub issue list, so the community can participate.
Contact
We provide the software as is in a Community Edition format. T-Pot is designed to run out of the box and with zero maintenance involved.
We hope you understand that we cannot provide support on an individual basis. We will try to address questions, bugs and problems on our GitHub issue list.
Licenses
The software that T-Pot is built on uses the following licenses.
GPLv2: conpot, dionaea, honeypy, honeytrap, suricata
GPLv3: adbhoney, elasticpot, ewsposter, glastopf, rdpy, heralding, snare, tanner
Apache 2 License: cyberchef, elasticsearch, logstash, kibana, docker, elasticsearch-head
MIT license: ciscoasa, glutton
Other: cowrie, mailoney, Debian licensing
Credits
Without open source and the fruitful development community (we are proud to be a part of), T-Pot would not have been possible! Our thanks are extended but not limited to the following people and organizations:
The developers and development communities of
- adbhoney
- apt-fast
- ciscoasa
- cockpit
- conpot
- cowrie
- debian
- dionaea
- docker
- elasticpot
- elasticsearch
- elasticsearch-head
- ewsposter
- glastopf
- glutton
- heralding
- honeypy
- honeytrap
- kibana
- logstash
- mailoney
- medpot
- p0f
- rdpy
- spiderfoot
- snare
- tanner
- suricata
The following companies and organizations
… and of course you for joining the community!
Stay tuned …
We will be releasing a new version of T-Pot about every 6-12 months.
Testimonial
One of the greatest feedback we have gotten so far is by one of the Conpot developers:
“[…] I highly recommend T-Pot which is … it’s not exactly a swiss army knife .. it’s more like a swiss army soldier, equipped with a swiss army knife. Inside a tank. A swiss tank. […]”
Fun Fact
In an effort of saving the environment we are now brewing our own Mate Ice Tea and consumed 73 liters so far for the T-Pot 19.03 development 😇